N.B. : Use the Peugeot Planète System
diagnostic equipment.
 | |
| Figure : b2ckupbd | |
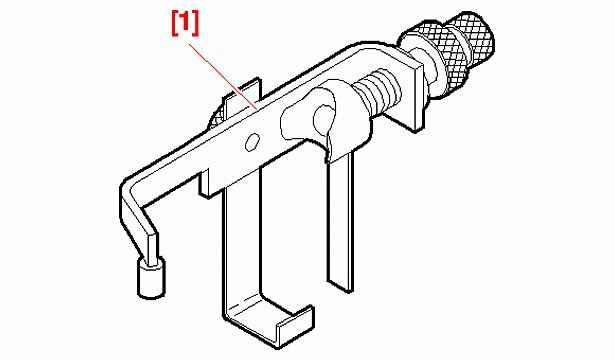
[1] Controlled manual gearbox clutch actuator adjustment tool
(-).0317-AT.
 | |
| Figure : b2ckupcd | |
The following operations are prohibited :
- Manipulating the clutch actuator via the push rod (1)
- Compress and release the push rod (1)
- Supply the clutch actuator directly with a supply source 12,0 V
- Control the removed actuator (Using the diagnostic equipment)
- Placing your fingers on the contacts of the switch (risk of electrical discharge)
CAUTION : Each time the clutch actuator is
refitted : Set to position (Pre-charging) ; Initialise the control unit (Using
the diagnostic equipment) .
Fitting a clutch actuator that is not adjusted (without
pre-compression) causes the following problems :
- A reduced longevity of the clutch
- The destruction of the clutch stop
CAUTION : Ensure that the clutch is closed
before removing the clutch actuator ( as (B)) .
 | |
| Figure : b2ckupdd | |
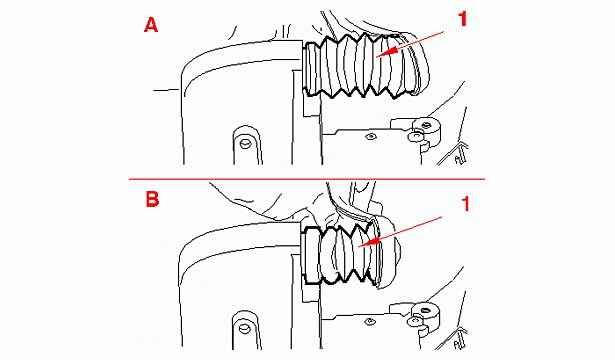
A : Rod out = Clutch open (Clutch in released position) .
B : Rod in = Clutch closed (Clutch in engaged position) .
Switch on the ignition.
Engage : Gear N (Gear selector) .
Points to observe : The appearance of the indication N on the
instrument panel .
Switch off the ignition.
N.B. : Wait 1 minute to permit
deactivation of the controlled manual gearbox ECU.
CAUTION : Do not open the doors (Before
the deactivation phase) .
Check that the push rod (1) is in the in position (Clutch closed
- as (B)) :
- If the push rod (1) is in the out position ( as (A)) : Control the closing of the clutch using the diagnostic equipment before removing it
- If the thrust rod (1) is in the in position ( as (B)) : Remove the clutch actuator in this position
Connect the diagnostic equipment to the vehicle.
Select the menu :
- Diagnostic /Test by ECU / engine - automatic gearbox/Piloted manual gearbox
- On the actuators test menu, select : Clutch test /Closing of the clutch
Switch off the ignition.
CAUTION : Do not open the doors (Before
the deactivation phase) .
N.B. : After switching off the ignition,
wait 1 minutes before disconnecting the battery (To ensure that the learning
patterns of the various ECUs are stored in memory) .
Disconnect the battery negative terminal.
CAUTION : If the clutch cannot be closed (
as (A)) : Remove the clutch actuator in this position ; Remove it carefully as
it is under stress on the clutch fork ; Slacken the fixing bolts progressively
(Support the actuator from underneath to prevent it from falling) .
 | |
| Figure : b2ckuped | |
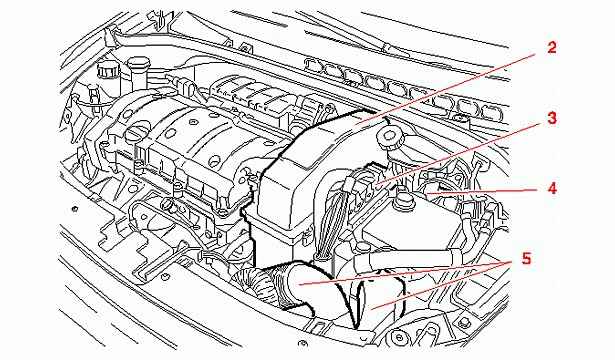
Disconnect :
- Battery
- injection ECU (3)
- Electric power steering ECU (4)
Remove :
- The air cleaner (2)
- The injection ECU (3)
- The battery (/)
- The air duct (5)
- The resonator (5)
 | |
| Figure : b2ckupfd | |
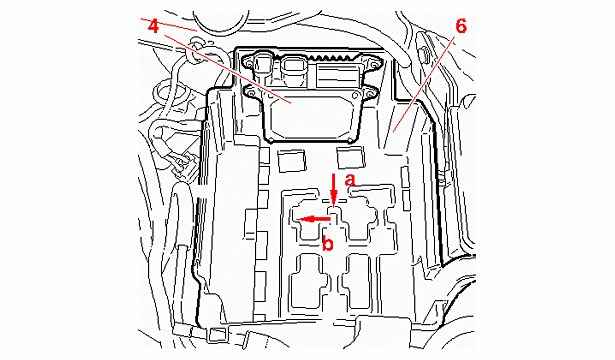
Unclip : Electrical harnesses (Battery tray (6)) .
Remove :
- Battery tray (6)
- Electric power steering ECU (4)
N.B. : To remove : The battery tray (/)
(Pull at (a) and push at (b) - Following the arrows) .
 | |
| Figure : b2ckupgd | |
Disconnect the connector (7) .
Unscrew the bolts (8) without removing them (4 turn(s)) .
Move the clutch actuator (9) to detach the bolts (8) in the
oblong holes .
Remove : The clutch actuator (9).
 | |
| Figure : b2ckuphd | |
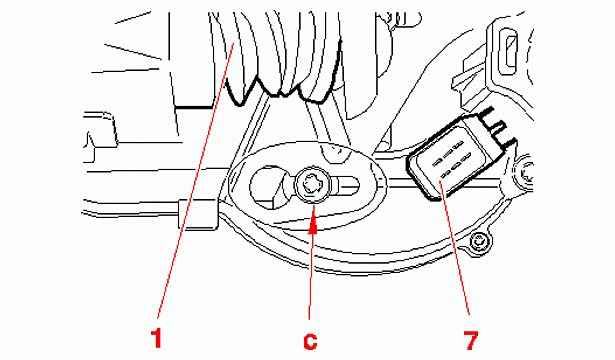
Check :
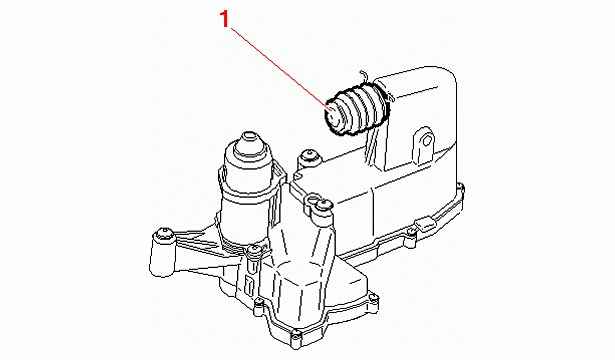
- Check the condition of the push rod protection gaiter (1) (Sealing)
- The connector (7) (No humidity or dust)
- The surfaces (c) of the 3 clutch actuator fixing bolts (Clean and dry)
 | |
| Figure : b2ckuqvd | |
N.B. : New clutch actuator : Fit the bolts
(8) on the clutch actuator (9) without tightening them (Leave a clearance of 5
mm) .
Under the vehicle : Refit the clutch actuator (8) bolts (9) in
the oblong holes in the support (10).
N.B. : The bolts (8) must slide freely in
the oblong holes in order to set the clutch actuator .
 | |
| Figure : b2ckuqxd | |
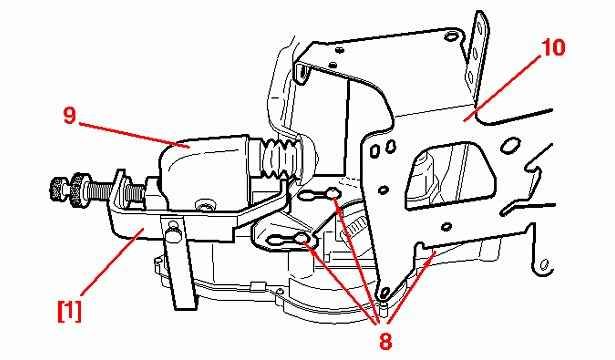
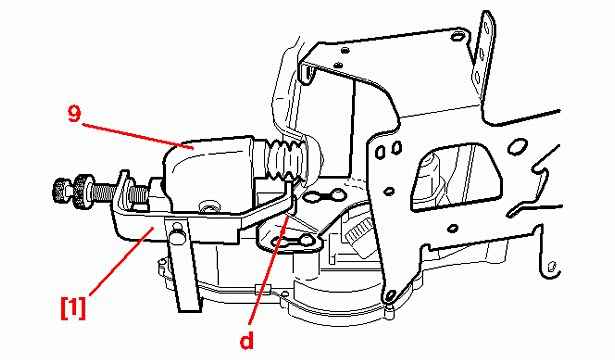
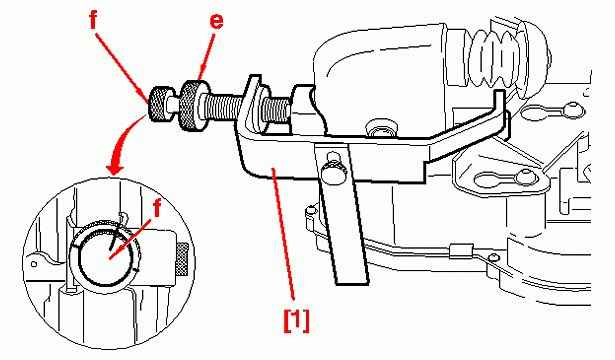
Clutch actuator : Position the tool [1] on the clutch actuator
(9).
N.B. : The positioning pin of the tool [1]
must be positioned behind the stiffener ( as (d)) .
 | |
| Figure : b2ckuqwd | |
Tighten the adjustment bolt at (e) until the push rod is in
contact with the clutch fork .
CAUTION : The nylon shim of the push rod
should be centred in the declutch fork.
ESSENTIAL : Mark the position of the bolt
at (f) using the marks engraved on it.
Rotate 3 time(s) using the adjusting screw ( as (f)) .
Observe the movement of the clutch actuator in the oblong holes
in the support (3,0 mm ) .
Tighten the 3 bolts (8) to 1.0 ± 0.2 m.daN .
Remove the tool [1].
Connect the connector (7).
Refit :
- The air cleaner (2)
- The injection ECU (3)
- The battery tray (6)
- The battery (/)
- The air duct (5)
- The resonator (5)
Connect :
- injection ECU (3)
- Electric power steering ECU (4)
- Battery
CAUTION : Following refitting of the
clutch actuator : The clutch actuator must be programmed.
 | |
| Figure : b2ckux5d | |
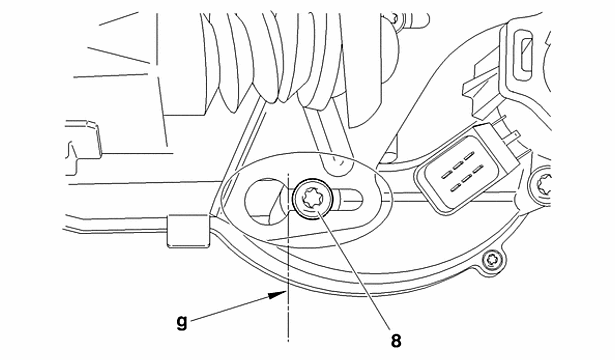
CAUTION : Following adjustment of the
clutch actuator , the bolt heads (8) must not protrude from the oblong holes
(Shaft (g)) ; If this is not the case : Readjust) .
2 Learning operations possible :
- The programming of the terminal positions
- The programming of the point of slight contact of the clutch
The clutch actuator must be programmed.
In the following cases :
- Removing - refitting : Clutch actuator
- Replacement : Clutch
- At each replacement : Computer ( gearbox)
- Clutch grabbing
Conditions which must be followed :
- Engine stopped
- Ignition on
- Vehicle on a level surface
- Handbrake off
- Use a charger suited to the battery and the type of charge required : The battery voltage must be equal to or greater than 12,5 V (battery correctly charged)
CAUTION : A drop in the battery voltage to
below 10,5 V during the programming procedure results in failure of the
programming operation.
ESSENTIAL : Follow the diagnostic
equipment procedure.
Connect the diagnostic equipment to the vehicle.
Select the menu : Replacement Parts/Piloted manual gearbox
.
Select one of the following 3 menus in accordance with the
operation carried out :
- Clutch actuator replacement
- Replacement of the clutch
- change : Computer
The diagnostic tool performs :
- The programming of the terminal positions
- The programming of the point of slight contact of the clutch ( engine running)
When programming is complete :
- Switch off the ignition
- Following the switching off of the instrument panel : Wait for at least 4 minutes (Storing of the programming operation)
Start the engine.
Carry out the following procedure 10 times in succession,
pressing the brake pedal :
- Engage 1st gear (Position 1)
- Select neutral (Position N)
- Wait 5 seconds
The parking brake is self-adjusting.